
Diving headfirst into a painting project without enough paint know-how can lead to disastrous results. There’s more to it than dipping a brush into some paint and coloring in the blanks. At the very least, you’ll need to know three very important painting basics.
We’re going back to the fundamentals. For those new to painting, always keep this in mind: the beauty of a painted wall—and how long it stays beautiful—does not only rely on the topcoat (a.k.a. the final color you see on your walls). All the other steps before, during, and after play key roles in helping to ensure the paint remains problem-free and lasts a long time.
In this blog post, we go through three important painting basics to always follow when undertaking any painting project. Take these to heart and you’re well on your way to achieving your dream look.
1. Choose the right type of paint for the surface

There’s a reason why there are so many paint cans on the shelves of hardware stores. Not only are there several colors to choose from, but there are also different paints for different uses. There are paints for interior and exterior surfaces and paints for different types of surfaces which include concrete, wood, metal, and drywall.
So, if you’re painting a bedroom, for example, you will need paint that’s formulated for application on interior surfaces. Depending on the product, it may be the case that the same paint is not advised for use on the exterior walls of your home. If you do, it’s likely you’ll see the paint aging far, far sooner than if you used paint specifically manufactured to be used on exterior surfaces.
There can be even worse outcomes too, such as seeing problems immediately after applying the paint. For example, paint for wood that’s not meant to be applied on concrete but used on concrete nonetheless, can remain sticky and never completely dry. Yikes!
Remember: each paint product is specifically formulated for the surface they’re meant to be applied on. Pair the wrong paint with the wrong surface and you’re just asking for trouble.
2. Prepare the surface you’re painting on
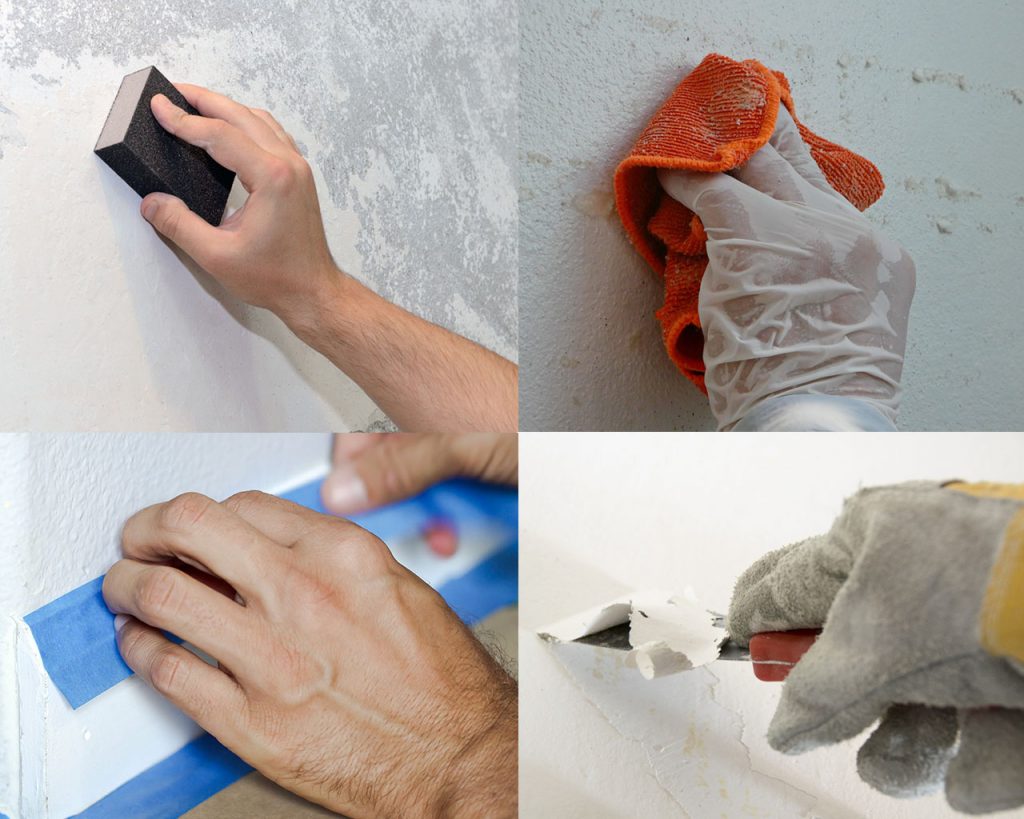
When it comes to painting, little goes well without proper surface preparation. By preparing the surface, you’re essentially ensuring that whatever you’re working with is ready and in the proper condition to be painted on. This prevents paint problems like peeling, flaking, and efflorescence.
Surface preparation is another instance where knowledge is power. It’s because different surfaces call for different surface preparation procedures. It can also vary depending on whether you’re working on a surface that’s never been painted before or repainting it.
To give you an idea of what surface preparation usually entails, new concrete, for example, needs to “cure” before you paint—this means waiting several weeks before you can start working on it. As another example, for metal surfaces, like galvanized iron sheets (yero), an etching solution must be applied first then followed immediately by a primer before you can apply a topcoat (a.k.a. your choice of paint color). Again, these all help you avoid problems down the line like your metal from rusting.
Too much to take in? Don’t worry. Let It B has beginner-friendly guides to take you through the surface preparation procedures of whatever you may be working on. You can find them here.
3. Follow the painting schedule

A painting schedule is basically a rough painting guide. For example, after preparing a concrete surface, a painting schedule tells you which primer and putty to use with your paint. Then, it also tells you how many coats of paint you’ll need to apply to your wall for the best-looking finish.
Why is this important? It all goes back to compatibility. Ideally, every product should be compatible with both one another and the surface they’re to be used on. Otherwise, you run the risk of, again, encountering paint problems—which wastes effort, time, and money.
Here’s a sample painting schedule:
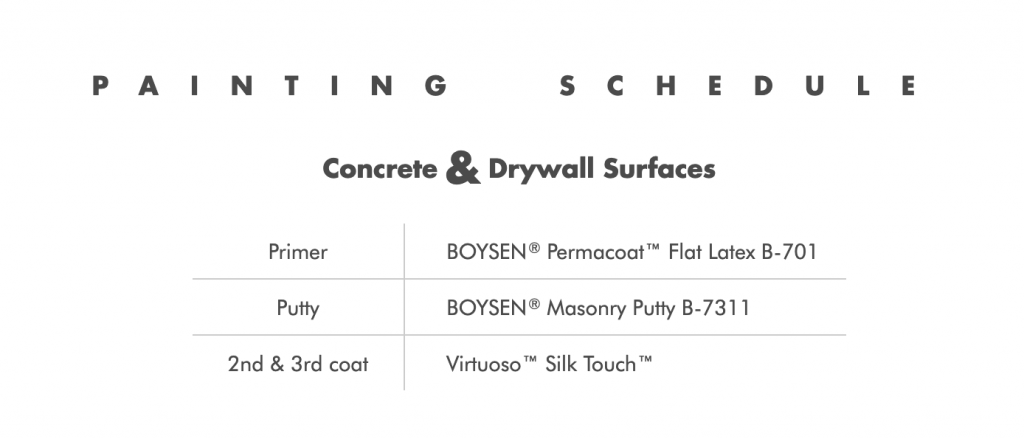
With a painting schedule, Boysen eliminates the guesswork for you. Once you have your chosen paint, simply follow it to know which other products to get at the hardware store for your painting project. Convenient, right? You can find the painting schedule of all Boysen products at Boysen.com.ph or on the Boysen app. You’ll also find all the technical details there such as recoat time, thinning solvent, and more.
That’s it! You now have three essential painting basics in your DIY arsenal. Congratulations! We hope this has helped you feel more confident about pulling off a painting project. If you have any questions about painting or Boysen paint products, our technicians will be happy to help. Send us an email at ask@myboysen.com or call us at (02) 8363-9738 local 417 to 418 during office hours for a one-on-one consultation.


